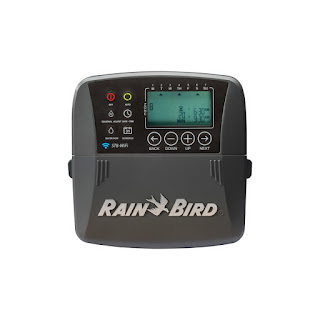
Setting up a RainBird ST8I-WIFI Controller
So this Spring my wife and I have been getting repairs made to our yard and outside needs of our house. Two thing we needed done were to get out sprinkler system fixed and repair and get new Sod layed to cover a very large dead spot. So since were were fixing out sprinklers and the whole system was 10years old we decided to upgrade to a wireless system.
We got the RainBird ST8I-WIFI Irrigation Controller at Lowe's.
Unless you know how to wire a system up I would hire a professional to do that. But you old system and the new system should look something like this below.
you will notice numbers 1-6 those are your stations. In this case 1 is red, 2 is blue and so on. Just take a picture of you old controller and match it to the new one.
Once setup and turned on we are ready to setup the wireless portion. Download the rain bird app from the Google play store or Apple App Store and install.
Once installed open the app, and it should ask you which Rain Bird Controller you have. In my case I selected the Black one labeled ST8X WF.
At this point you wifi module should be flashing red and green, and click next.
At this point do what the setting say and in your device setting connect to the Rain Bird open network. Should be RAINBIRD{numbers and letters}. Once connected click next on the top right.
On this next screen you can change the name of the controller and click next.
Then next enter your zip code and click next again.
On this screen make a password to protect your controller and click next.
Enjoy your Rain Bird Controller!
We got the RainBird ST8I-WIFI Irrigation Controller at Lowe's.
Unless you know how to wire a system up I would hire a professional to do that. But you old system and the new system should look something like this below.
you will notice numbers 1-6 those are your stations. In this case 1 is red, 2 is blue and so on. Just take a picture of you old controller and match it to the new one.
Once setup and turned on we are ready to setup the wireless portion. Download the rain bird app from the Google play store or Apple App Store and install.
Once installed open the app, and it should ask you which Rain Bird Controller you have. In my case I selected the Black one labeled ST8X WF.
At this point you wifi module should be flashing red and green, and click next.
At this point do what the setting say and in your device setting connect to the Rain Bird open network. Should be RAINBIRD{numbers and letters}. Once connected click next on the top right.
On this next screen you can change the name of the controller and click next.
Then next enter your zip code and click next again.
On this screen make a password to protect your controller and click next.
Here we are going to press 'yes' to connect to your WiFi network.
Select your 2.4ghz network and enter you wireless password then click next.
Here you need to check that the wireless module on the Rain Bird Controller is only blinking Green. If so select "Green Only"
At this point go back to your network setting and reconnect to your wireless network.
On this next screen it is going to suggest making a backup of your current controller settings, so click yes.
It will popup your email and to email yourself the file, enter your email in the to: field and click send. Close out of your email and your will get to the last screen of the setup, you just need to click done.
At this point your app on your phone is connect to your Rain Bird Controller, but you still need to setup the controller to your sprinklers if you have not already done it manually.
The most important part to setup is which zones are being used. Open the app back up and select your Rain Bird Controller.
On this next screen at the bottom left you will select "+/- Zone"
Selecting the "+/- Zone" will bring up a list of zones 1-8. You can turn the zones you are using on and rename them. I have renamed 3 of them here but the 6 i am using are turned on. Once you are done click done.
After clicking Done on each screen it will contact the Rain Bird Controller to update the settings, which will look like this. Just wait for it to be done.
Once done your Zones are now usable and you can setup a scheduled. On each zone click the pencil to edit each zone.
You will select the Frequency, Start Times, and Run time. We Currently have water restrictions so our days we can water are Thursdays and Sundays, and I am going to run them for 6 min, and start at 10p. Once setup click done.
Do this for every zone.Enjoy your Rain Bird Controller!


Comments
Post a Comment