Posts

Setting up a RainBird ST8I-WIFI Controller

Image
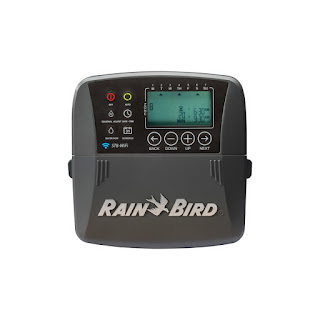
So this Spring my wife and I have been getting repairs made to our yard and outside needs of our house. Two thing we needed done were to get out sprinkler system fixed and repair and get new Sod layed to cover a very large dead spot. So since were were fixing out sprinklers and the whole system was 10years old we decided to upgrade to a wireless system. We got the RainBird ST8I-WIFI Irrigation Controller at Lowe's. Unless you know how to wire a system up I would hire a professional to do that. But you old system and the new system should look something like this below. you will notice numbers 1-6 those are your stations. In this case 1 is red, 2 is blue and so on. Just take a picture of you old controller and match it to the new one. Once setup and turned on we are ready to setup the wireless portion. Download the rain bird app from the Google play store or Apple App Store and install. Once installed open the app, and it should ask you which Rain Bird Controller you h

Setting up Philips Hue Bridge and Light bulbs

Image
So I had issues keeping the Sengled element classic blubs connected and I wanted to try the Philips Hue setup. So I ordered a set of 4 to set up and I will most likely replace more bulbs as I go.  This is the 2 things you need to get started and they do have a starter kit that includes both. This guide is to setup the Bridge and Connect the Bulbs to the Bridge. Let start with the Hue Bridge. To start with plug in the power and network cable. Then Install the Philip Hue app to your phone and open it. Once it is installed and opened, It will automatically Search for the any "Hue Bridges" Once one is found you should get a message like this one below. At this point just click setup and you will get a image like below telling you to press the big button on the Hue Bridge.  My Bridge had 2 updates it had to finish before I could move on. ******Startign the setup of the lights****** Once the updates were done it came up with this screen below. When you

Sengled element classic (E11-G14, E11G14) Setup with VeraPlus

Image
So these bulbs were a challenge to setup after alot of digging a tip from my co-worker I got them setup. And I am going to share how with you so hopefully it wont be as painful for you to setup. -First step install the bulb into a Lamp  -The move the Lamp or VeraPlus within 1-2ft of each other. -At this step you will either be at the end of the Setup Wizard from my initial setup guide to the VeraPlus, That says "Welcome to the install device wizard" and you click "Next" OR you can Select "Devices" on the LEFT then "Add Devices" on the RIGHT -Both ways will bring you to the screen that say "Select Your Device" -At this screen we are going to click in the search and type in "Sylvania" and this will bring up the "Dimmable LED Light Bulb" w/ subtitle of "OSRAM SYLVANIA iQBR30" and you want to click on that. - Here you will get this screen but before you go ferther you need to use the use

Setting Up VeraPlus Advanced SmartHome Controller

Image
I received this VeraPlus Advanced SmartHome Controller from work, now it is time to set it up. -Plugin power and Ethernet cables. -Wait for Power, Internet, and Wi-Fi lights to go green -Goto http://home.getvera.com -Select the blue box "I have a new controller to setup" -Scroll down and check "I agree to the Terms & Conditions" then click Continue. -Then again Scroll down on the Privacy Policies and check "I acknowledge" then click "Continue" -Now on this page you only have to check the top option then click "continue" -On the next page it will ask you to choose your controller, I choose VeraPlus   -Here you choose you device it detected on your network. -Then click Next Step -Ok, here we are going to be creating an account, fill out the info and pay attention the the password requirements. -There will be 1-2 more pages of info to fill out(sorry forgot the screenshot) -You will